Introduction
Resources can be logically organized according to where they are physically located.
For example, all the resources in your corporate office can be grouped based on the location of your office.
The following can be viewed:
- Policy log and schedule maintenance for the group of resources can be viewed.
- Availability statuses of the resources belonging to the site (or the location).
Before you start, discover all the resources for your location.
Permissions
Following are the permissions required to perform various tasks.
| Category | Permission Type | Permission Value | Task |
|---|---|---|---|
| Account Administration | Devices | Manage and Access to all resources. | To create, update, and delete a site. |
| Devices | View | To view a site. |
Note: The above is applicable to both Partner and Client users.
Create a Site
Site creation includes providing details about a location and adding resources belonging to that location.
Note
One device cannot be added in two locations.Navigate to Infrastructure > Search.
Click the Resource Categories dropdown available on the left pane.
Select the Sites option.
Click on the menu (three dots) icon available beside the search icon and click on Add Site.
Enter the following details on the Add Site page:
- Name: Give a site name typically based on the location of the resources.
- Parent Site: Default value is None(Top Level).
Note: If you select a site from the dropdown, a subsite is created under the site selected.
Provide details about the site in the Description box.
Provide details for Site Location: Country, State, Zip, City, and Address.
Select the primary contact person from the dropdown.
Enter the phone number.
In the Assigned Resources section, you can assign the resources to the site either through filter criteria or by manually assigning them, or both.
- Filter Criteria
- Click anywhere in the Filter Criteria box and click on +Query.
- Build a query using OpsQL. The matching results are displayed. The list has Name, Resource Type, IP Address, and Operating System columns.
- Click on Apply Selection. All the resources are added.
Note: The maximum number of regex terms that can be used is 5.
- Manually Assigned Resources
- Click anywhere in the Manually Assigned Resources box and select the resources. You can also click on Advanced Search to build a query using OpsQL. The matching results are displayed.
- Select the resources and click on Apply Selection. The resources are added.
Note: You can add a maximum of 100 resources.
- Filter Criteria
Click on Save. The site is created. Use the search box to search for the site.
Manage sites
Effectively manage resources with tasks like editing, scheduling maintenance, monitoring activities through logs, removing unnecessary sites. This approach ensures effective resource allocation and optimal performance and monitoring of resources.
You can perform the following actions on a site:
View site details
Note: A user who has permission to view limited resources can view only the site(s) associated with those resources.
To view the site details:
- Search for the site and click the site name. The site details are displayed.
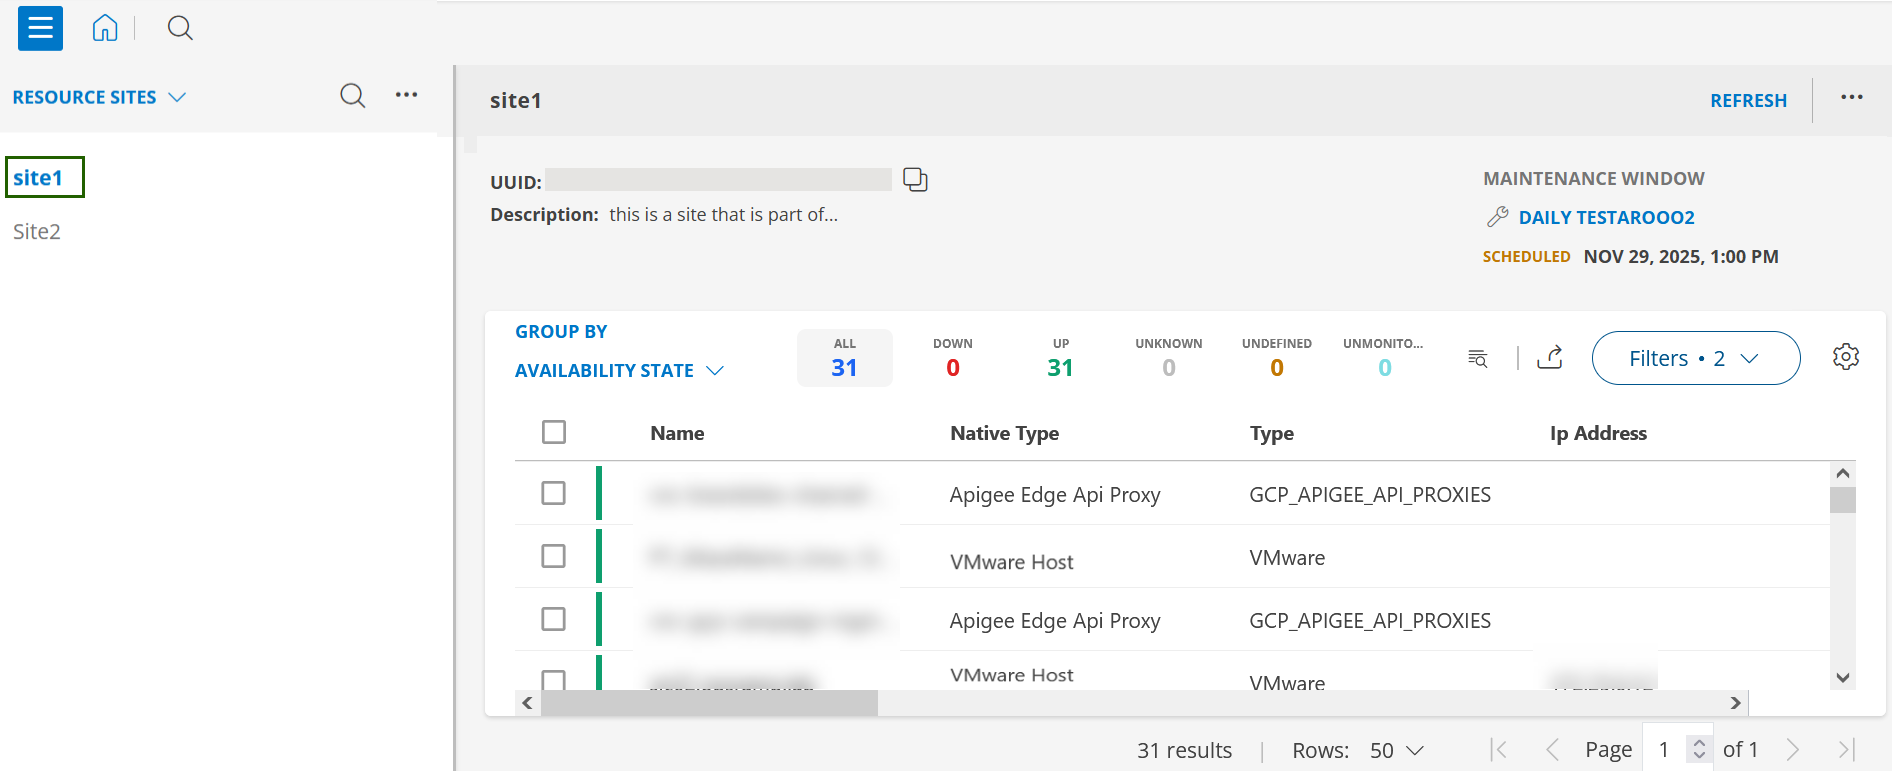
The site details page shows the following information:
- Header: Displays the site description and scheduled maintenance window information including maintenance window name, date, and time, UUID and description.
Note: These links are not clickable. - Body: Displays the resources that are, by default, grouped by Availability State.
It also has Search, Filter, Export, and column Settings options.
See Infrastructure Search for more information on these features.
To view resource summary:- Use search option to search for the resource.
- Click the resource name. A slide-out is displayed that has all the information related to the resource including resource name, Ip Address, number of alerts, tickets, notes, schedule maintenance details, Overview, Related resources, custom attributes, related service groups and resource groups.
You can perform actions like assign credentials and custom attributes, add maintenance window or a note, edit attributes, assign templates, unmanage, and delete.
Refer above link for more details.
Edit site
You can update the following fields:
- Site Name
- Description
- Site Location details
- Primary Contact information
- Assigned Resources
Follow these steps to edit an existing site:
Navigate to Infrastructure > Sites.
From Infrastructure Home Tab, click the Resource Categories dropdown available on the left pane.
Select Sites. All sites under the tenant are listed.
Click search icon and enter the site name.
Hover over the site name and click action (three dots) icon.
Select Edit. The EDIT SITE screen is displayed.
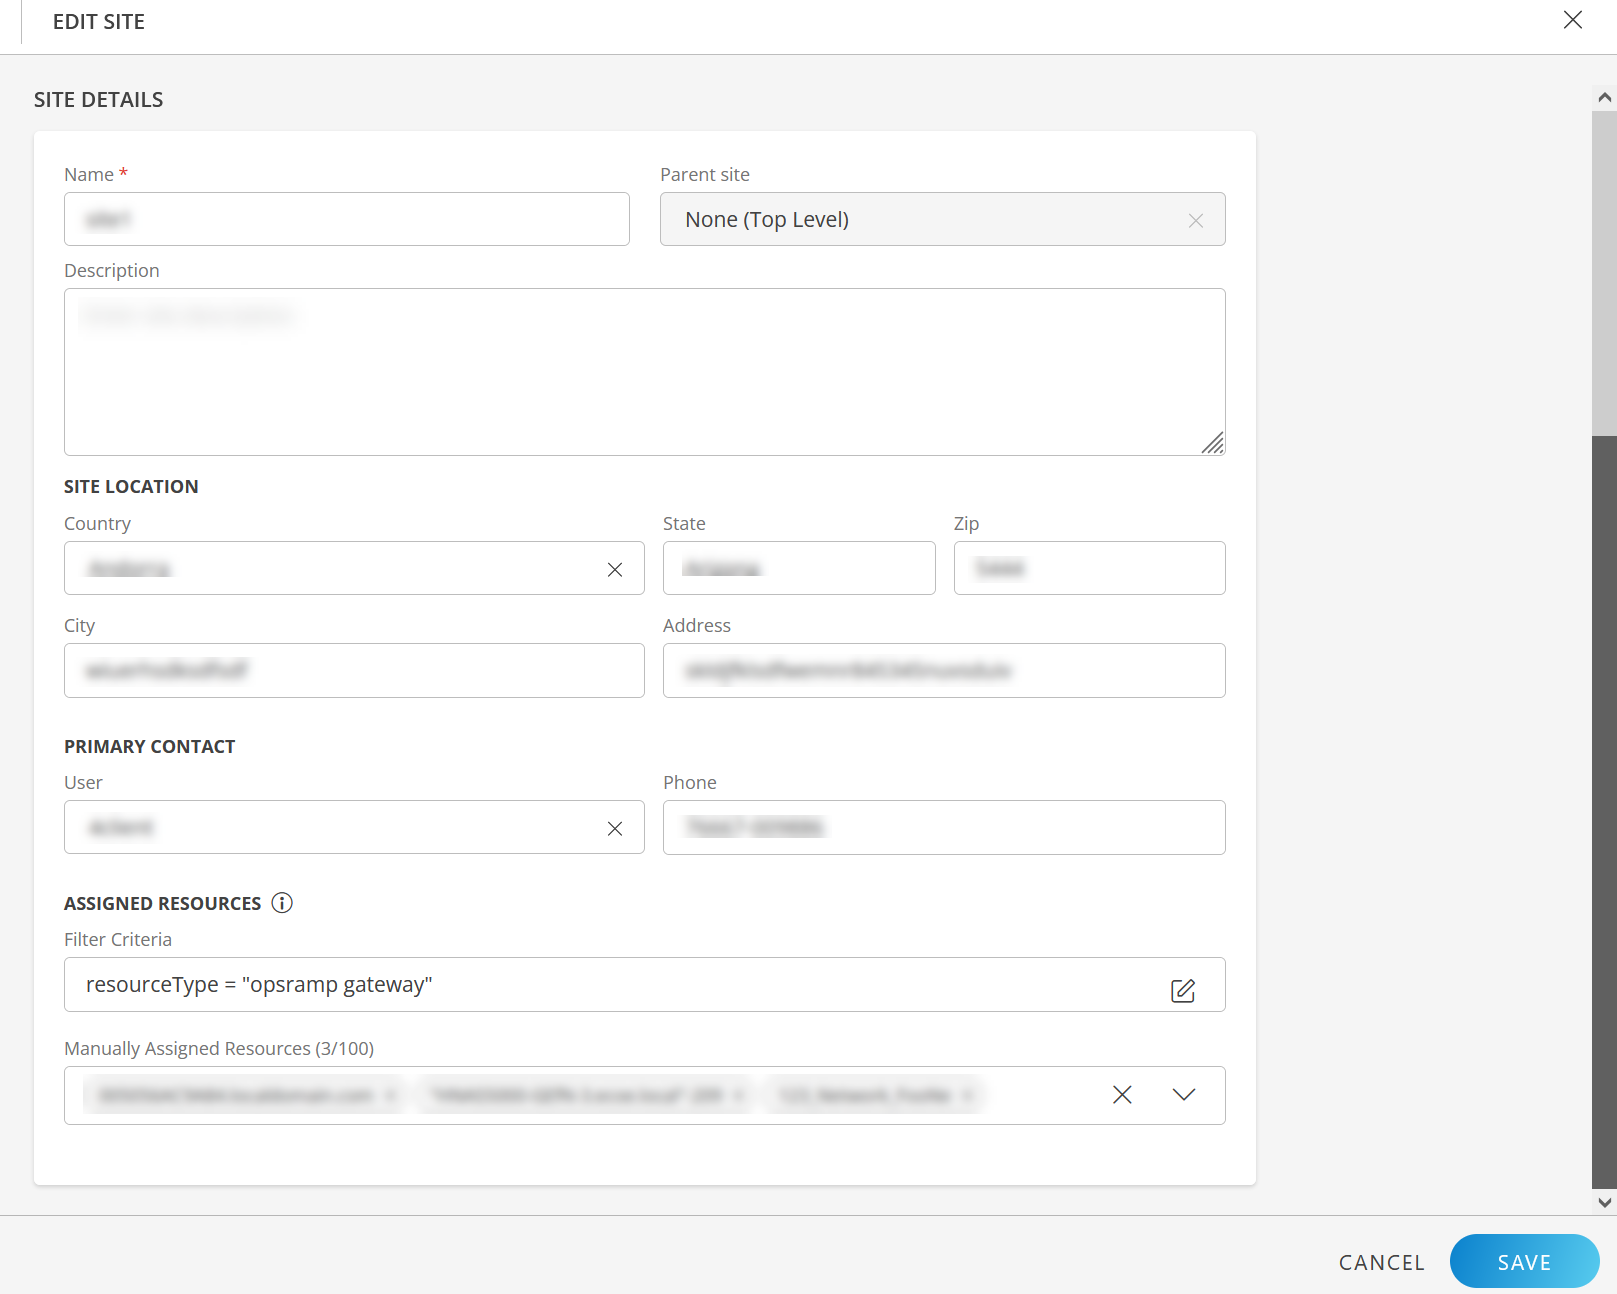
Update the details on EDIT SITE screen:
SITE DETAILS
Field Name Field Type Description Name String Update the site name, if required. Parent site Dropdown This field is not editable. Description String Update description of the site. SITE LOCATION String Update fields like Country, State, Zip, City, and Address as required. PRIMARY CONTACT String Update fields like User and Phone as required. ASSIGNED RESOURCES: - Filter Criteria
Selection
To assign resources using Filter Criteria:- Click anywhere in the Filter Criteria box and modify the query in the advanced search box, if required. The matching results are displayed.
- Click APPLY SELECTION.
The updated OpsQL query is displayed in the Filter Criteria box. Resources are added.
Note: The maximum number of regex terms that can be used is 5.
- Manually Assigned Resources
Dropdown You can assign or unassign resources in this field.
To manually assign resources:- Click anywhere in the Manually Assigned Resources dropdown and select the resources.
- Select the resources and click APPLY SELECTION.
Resources are added.
To unassign a resource:- Click x next to the resource name.
Click SAVE. The site details are saved.
Note: When a resource(s) is assigned or unassigned from a site, the corresponding log is visible in the Audit Details reporting app.
Add subsite
Follow these steps to add a subsite under a site:
- Navigate to Infrastructure > Sites.
- From Infrastructure Home Tab, click the Resource Categories dropdown available on the left pane.
- Select Sites. All the sites under the tenant are listed.
- Click search icon and enter the site name.
- Hover over the site name and click action (three dots) icon.
- Select Add Subsite. The ADD SITE screen is displayed.
You can change the Parent site, if required.
For more information on how to add site, see Create a site. - Click SAVE. The Subsite is created and is displayed under the parent site.
- A down arrow indicates a site that has a Subsite. Click the down arrow to view the created Subsite.
- You can create a Subsite for a child site.
Create scheduled maintenance
You can create scheduled maintenance on a site.
Follow these steps to add scheduled maintenance:
- Navigate to Infrastructure > Sites.
- From Infrastructure Home Tab, click the Resource Categories dropdown available on the left pane.
- Select Sites. All the sites under the tenant are listed.
- Click search icon and enter the site name.
- Hover over the site name and click action (three dots) icon.
- Select Add Maintenance Window. The ADD MAINTENANCE WINDOW screen is displayed.
- See Scheduled Maintenance for information on how to create scheduled maintenance.
- Click SAVE. The maintenance window is saved and a confirmation message appears.
View Activity Log
The View Activity Log functionality allows you to access logs related to sites. It allows you to monitor all activities and modifications made to sites.
Follow these steps to view activity logs:
- Navigate to Infrastructure > Sites.
- From Infrastructure Home Tab, click the Resource Categories dropdown available on the left pane.
- Select Sites. All the sites under the tenant are listed.
- Click search icon and enter the site name.
- Hover over the site name and click action (three dots) icon.
- Select View Activity Log. The Logs window is displayed.
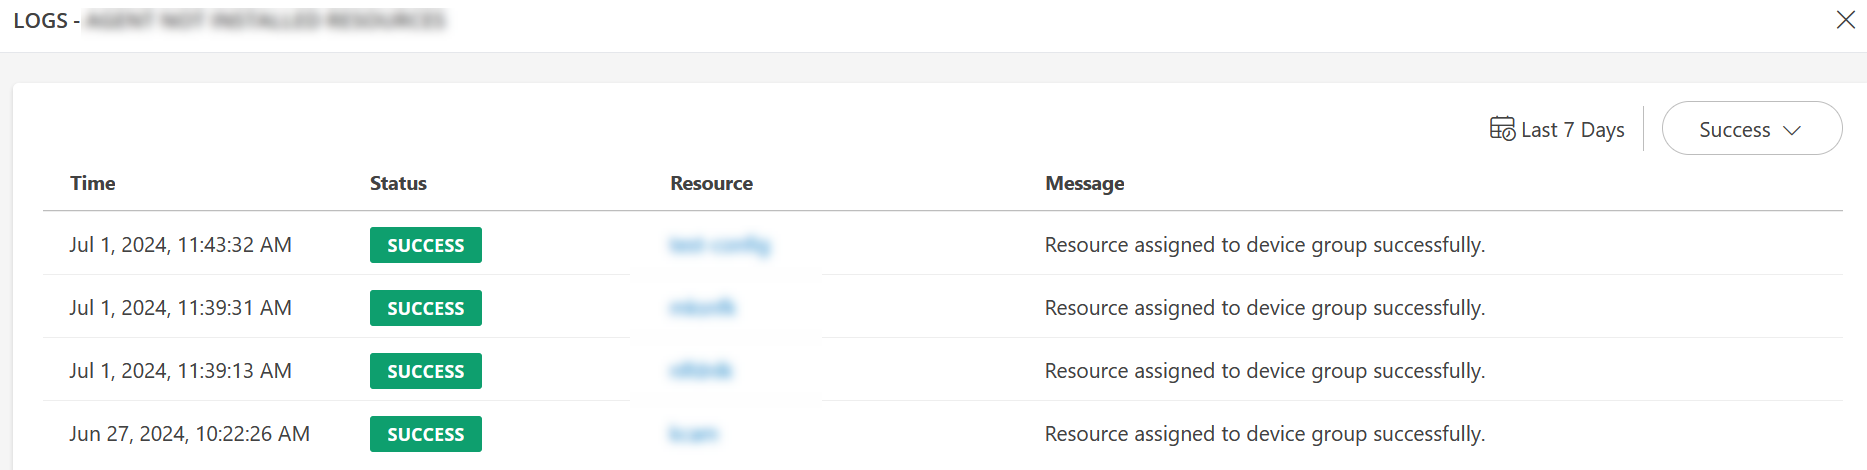
- Click on a log. The LOG DETAILS slide-out is displayed with additional information on the log.
To display logs based on date range:
- Click the date picker icon and select the desired range.
By default, logs are displayed for the last 7 days. - Click APPLY.
- Click the date picker icon and select the desired range.
To filter logs based on status:
- Click the dropdown next to the date picker.
- Select a status. By default, all success logs are displayed.
Note: Logs are generated based on rules. If resources are added manually, then logs do not appear.
Remove a site
Follow these steps to remove a site:
- Navigate to Infrastructure > Sites.
- From Infrastructure Home Tab, click the Resource Categories dropdown available on the left pane.
- Select Sites. All the sites under the tenant are listed.
- Click search icon and enter the site name.
- Hover over the site name and click action (three dots) icon.
- Select Remove. A confirmation popup is displayed.
Note:- The site and its subsites will be removed. Any resources assigned to this site will remain intact and will not be deleted.
- Verify the deletion to prevent accidental removal of critical sites.
- The site and its subsites will be removed. Any resources assigned to this site will remain intact and will not be deleted.
- Click REMOVE.
Note: You can also use the component menu (three dots) on the right-top corner of the page to perform all the above actions.